: A Step-by-Step Tutorial")
School management is an extensive undertaking, not to mention the painstaking efforts required to monitor academic progress carefully.
This is why school administrations use school management software to efficiently and justly manage data. This also helps in satisfying parents, teachers, staff, and students.
Not all school management systems are created equal. While you can employ the best, a simple spreadsheet gives you much freedom.
In this blog, we will set up a simple school management spreadsheet, provide some use cases and share tips on automation.
Let’s get started.
| SMSCountry is the best bulk SMS service to keep your staff and students informed 24/7. Learn more about our SMS services. Get started or schedule a demo. |
Why use a spreadsheet to manage your school vs other options?
Managing an entire school includes a wide range of activities. There is maintaining student records, attendance tracking, lesson planning, resource allocation, and budgeting. But there are compelling reasons why a spreadsheet is a powerful and versatile tool for school data management systems:
- Spreadsheets are familiar to most people, including educators and administrators at your school. They are also widely used across various industries. Your school staff members likely have a basic understanding of spreadsheets, reducing the learning curve. This familiarity also promotes efficient collaboration and quick adoption.
- Your school has unique needs, even if it doesn’t seem like it. Administrators and teachers use spreadsheets to keep up with different tasks. From designing student report cards to tracking extracurricular activities or managing staff schedules, spreadsheets are adaptable and handle diverse tasks.
- Your school probably has spreadsheet software in the office. This means you incur no significant cost in expanding its usage. In contrast, buying and maintaining specialised software can be financially burdensome. Especially if your educational institution is small and budgets are limited.
- Spreadsheets are accessible offline, ensuring critical data is recorded and updated without any loss. This feature is valuable in remote or rural areas with unreliable internet infrastructure.
- School management software may have integration limitations. Spreadsheets, however, easily integrate with any software or platform. This facilitates smoother data transfer and reduces the risk of data inconsistency.
Other options, including specialised software, often come with a set of features explicitly for school management. Such solutions are often cloud-based and rely heavily on the internet. While such a solution gets marks for functionality, it lacks customisation and may have a steeper learning curve and higher costs.
Step-by-step tutorial on using a spreadsheet for managing your school
From attendance tracking to resource planning, a well-organised spreadsheet can streamline tasks and boost productivity.
This step-by-step tutorial shows you how to use a spreadsheet to manage your school effectively. We will create a school management software in Excel and add some use cases. Feel free to change the structure of the Excel sheets to suit your needs.
Setting up the spreadsheet
Step 1: Start with a New Workbook
Download Excel if you don’t have it installed yet. You can use a cloud-based solution like Google Sheets; however, for schools, it is advisable to use localised software to ensure security.
Once downloaded, launch the software and open a “Blank Workbook”.
Step 2: Define your columns
Your columns represent the different pieces of information that you want to be tracked.
For example, if you are a teacher and want to track student progress, create a sheet with a column that lists the students’ details and then use one column each to note their progress.
The Biggest Benefits of Bulk SMS for the Education Sector (+ 25+ Free School SMS Templates)
So if your school offers three main exams to test students, create three columns to note the results for each student. In the end, create a column for “Total”, “Percentage”, and “Grade” or “Position”.
Alternatively, if you manage teachers’ attendance in the school management software in Excel, consider noting all the teachers’ names in one column and creating a monthly calendar. You can use different worksheets for different months or create the entire year on the same sheet.
However, either automate the attendance via a form or entrust the process to a single person to ensure the data collected is error-free.
Let’s look at a list of information you should include in your spreadsheet.
Information to include on your spreadsheet tracker
Consider using the following headers for your spreadsheet columns. These headers can be used in different combinations across multiple sheets within the school management setup in Excel.
- Student ID or registration number: as provided by the school.
- Full Name (First Name, Last Name): provided by the student’s guardians.
- Date of birth: as provided by the student’s guardians.
- Gender: as provided by the student’s guardians.
- Contact information: as provided by the student’s guardians.
- Address: as provided by the student’s guardians.
- Parent/Guardian Name: as provided by the student’s guardians.
- Parent/Guardian Contact Information: as provided by the student’s guardians.
- Grade Level/Class: as decided by the school.
- Attendance Records: marked after seeing the presence of the student.
- Exam Scores/Grades: marked after correcting the Exams.
- Assignment Scores/Grades: use this header to mark scores for assignments.
- Course Enrollments: use this header to list all the courses a student enrols in. You can use separate columns or add a list in a single column.
- Extracurricular Activities/Clubs: this column lists activities students like or follow.
- Medical Information: This column lists important medical issues and allergy information.
- Emergency contact info: use this column to list down contact info for guardians.
- Notes: use this column to add any miscellaneous information.
| Want to build a strong relationship with your students and staff on WhatsApp? Get our WhatsApp messaging solution Today! |
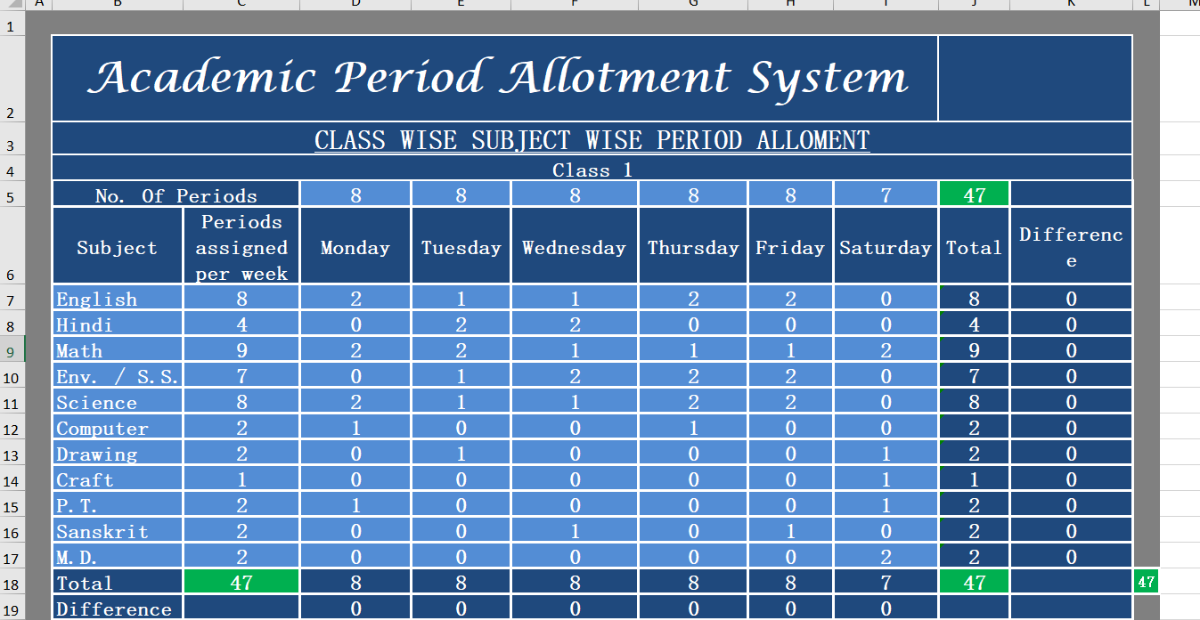
Use case#1: Creating a class schedule for students
Once you have started with a fresh Workbook, you need to define the columns for the school management setup in Excel. Here is a list you can consider using:
- Subjects: Time slots or subject names of classes during the school day.
- Names of weekdays: Add a column for each day of the week.
- Course name/Subject: Name of the subject or course.
- Course code (optional): Identification code for the subject/course.
- Teacher’s name: Name of the teacher for that class.
- Classroom Number (optional): Location or room number for the class.
You can add a column for “Total” and “Periods assigned per week”. These columns are for strategy purposes. You will fill in “Periods assigned per week” after consulting the teachers and the administration.
The difference between “Totals” and “Period assigned per week” shows you how to improve your planning.
For example, you were supposed to assign two periods per week for Drawing but ended up assigning one because you accidentally over-assigned science periods. The “Difference” column will show you where you are going overboard.
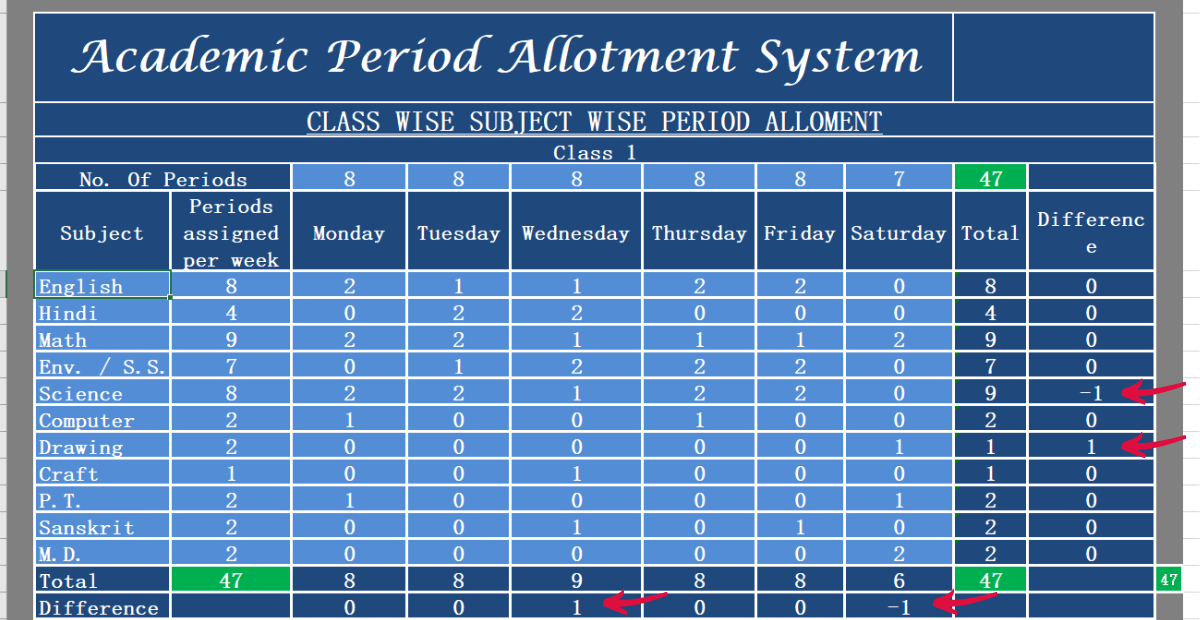
Now let’s look at how you can fill out your sheet:
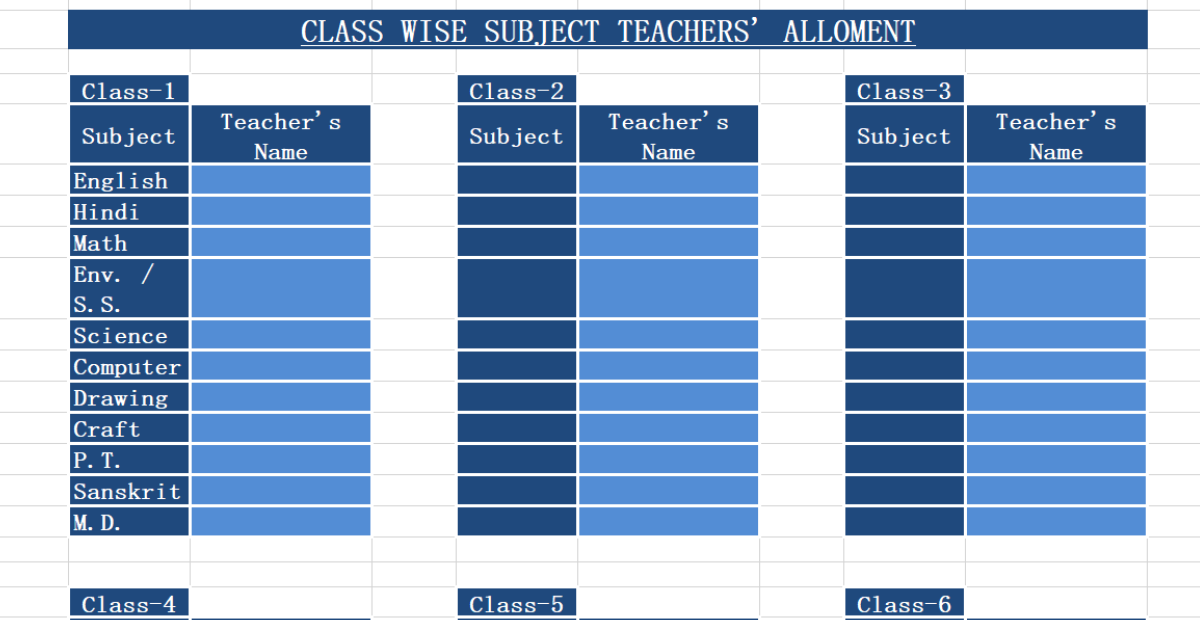
Step 1: Create two sheets
The first sheet will have the class schedule; the second will show you the teacher allotment.

Step 2: Populate the sheets
Once you create the columns, it’s time to start populating it. Remember, you can only assign a fixed number of periods per day. Add the “Total” formula at the end of each weekday to keep a check on the count of periods per day.
In our example, we set a limit of 8 for regular days and 7 for Saturdays.
Step 3: Use conditional formatting and automate
To make data stand out, add conditional formatting. You can also use a drop-down list for the teacher’s name column to minimise errors.
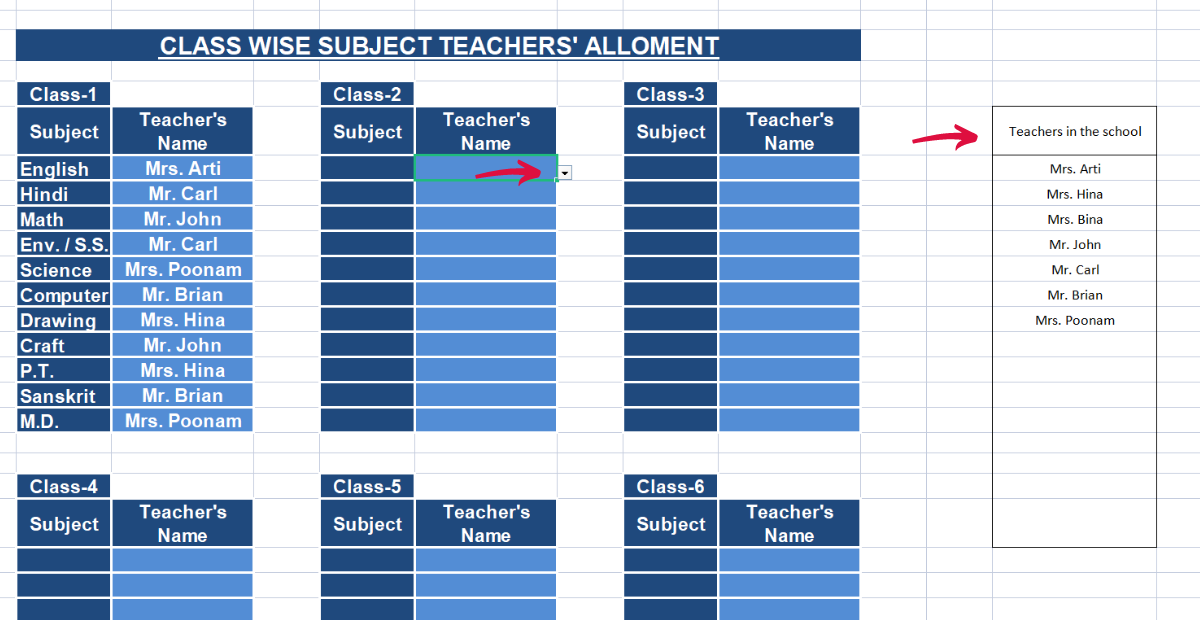
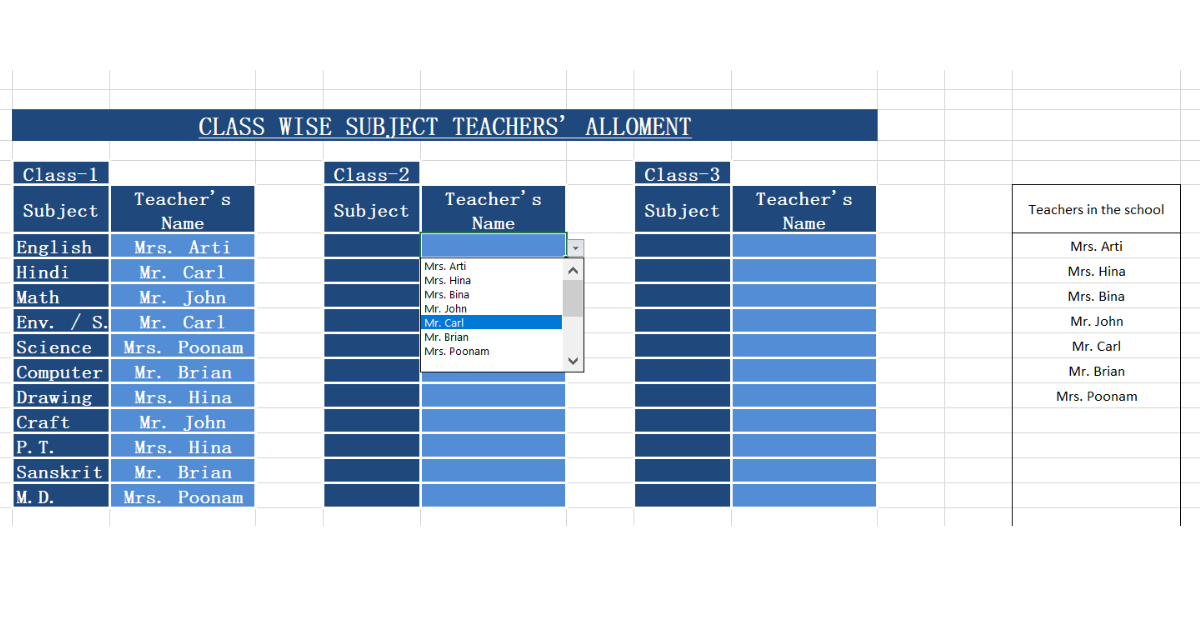
You can add other variations of the same headers to create more sheets. For example, you can create a class timetable with the teacher’s name or a teacher’s timetable.
However, we recommend using two basic sheets to get started. Save the sheets in .xlsx format. If you need to share the sheet, consider sharing a read-only file so your data is safe.
Use case#2: Creating a Gradebook
Open a fresh Workbook and create the following headers:
- Student ID: the ID assigned by the school
- Student’s name: The name provided by the student/guardians. You can also split the name into two columns: First and Last.
- Columns for assignments: Create a separate column for each assignment score.
- Columns for Exams: Create separate columns for exams taken throughout the school term, including the final exam.
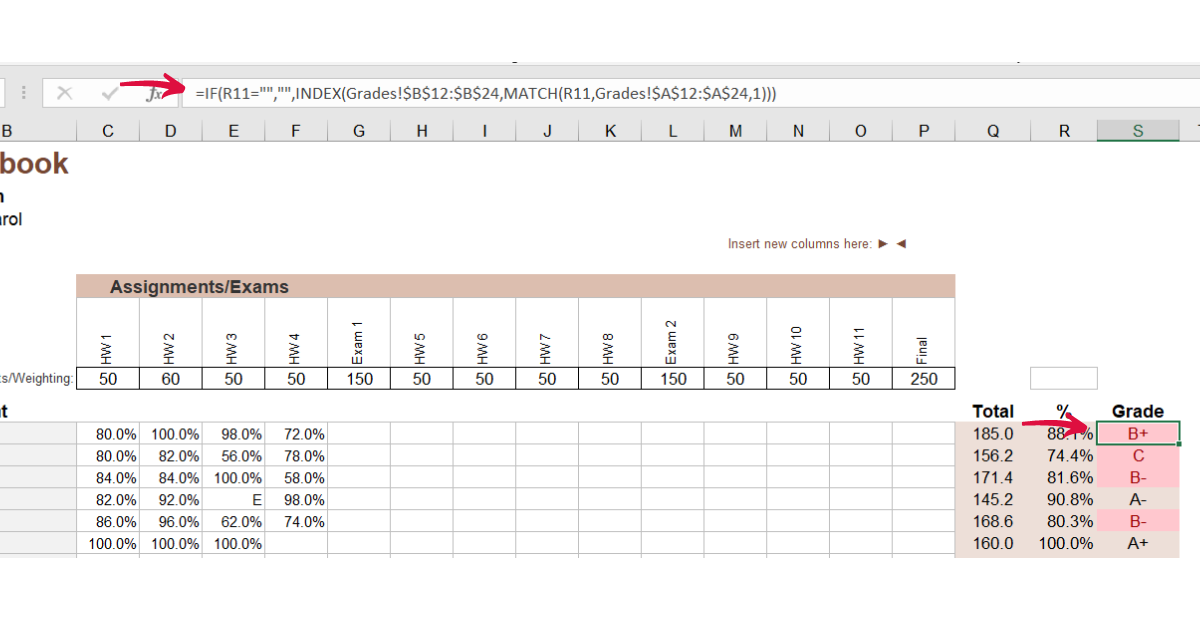
- Total score: Calculate the total score for each student in this column.
- Percentage: Calculate the percentage of each student based on the base scores for the term.
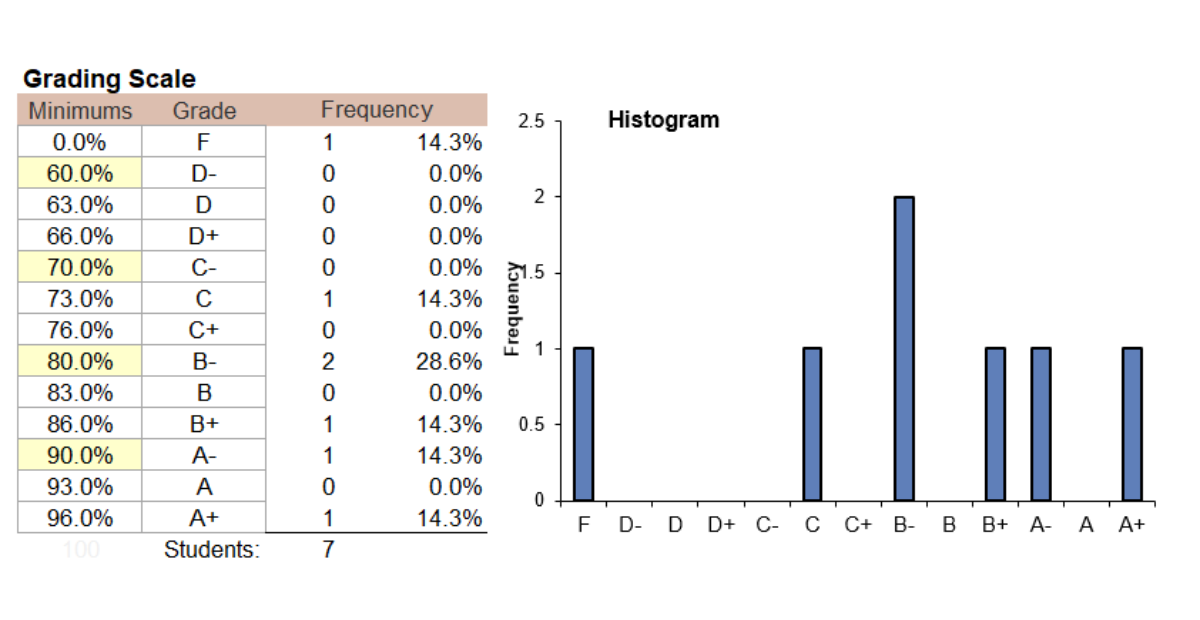
- Grade: Add grades based on the school’s scoring scale.
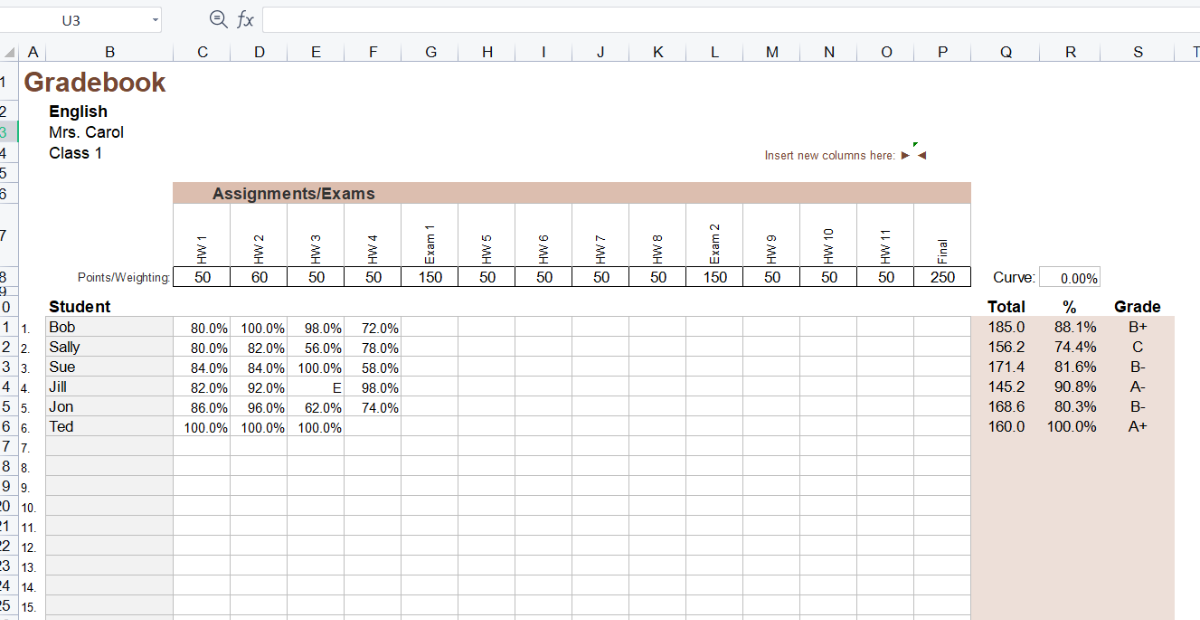

Step 1: Filling out the sheet
Once you add the columns in the school management system in Excel, start filling out the sheet by entering the student information and then the assignment and exam marks. If your school offers other methods of grading students, add a separate column for those.
This spreadsheet uses numeric calculations to grade students. If your school only offers grades, feel free to modify the sheet.
Step 2: Calculating the totals
Use the SUM formula to calculate the totals in the “Total Score” column. Add all the columns that list scores for assignments and exams.
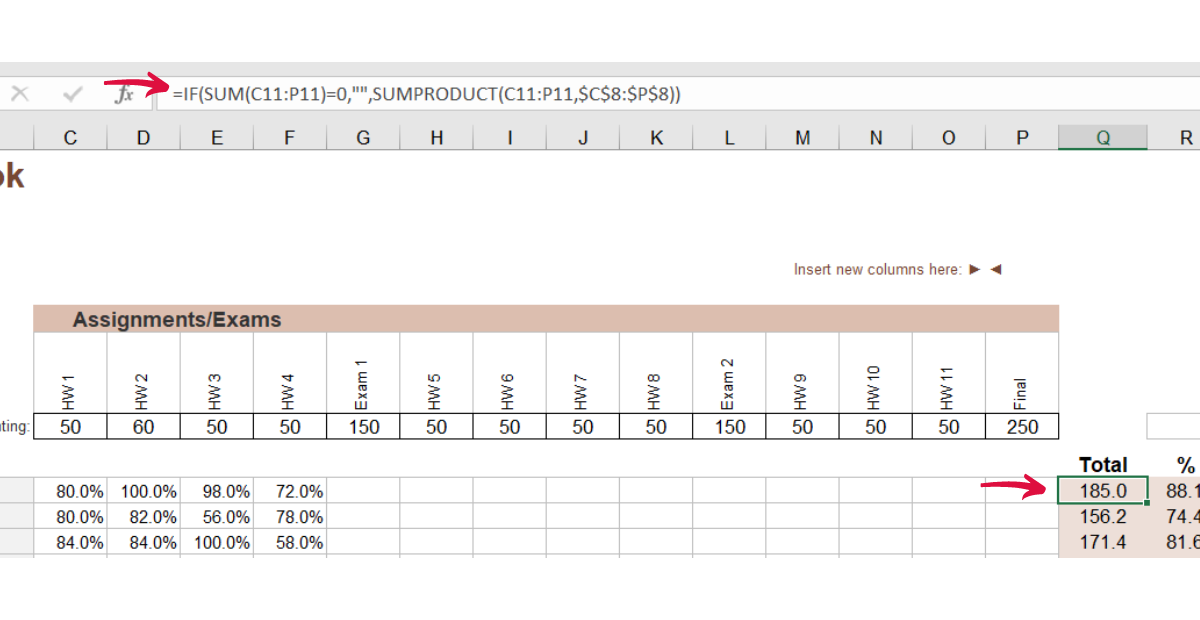
Step 3: Assigning grades
To automatically assign grades based on “Total score”, use the IF function.
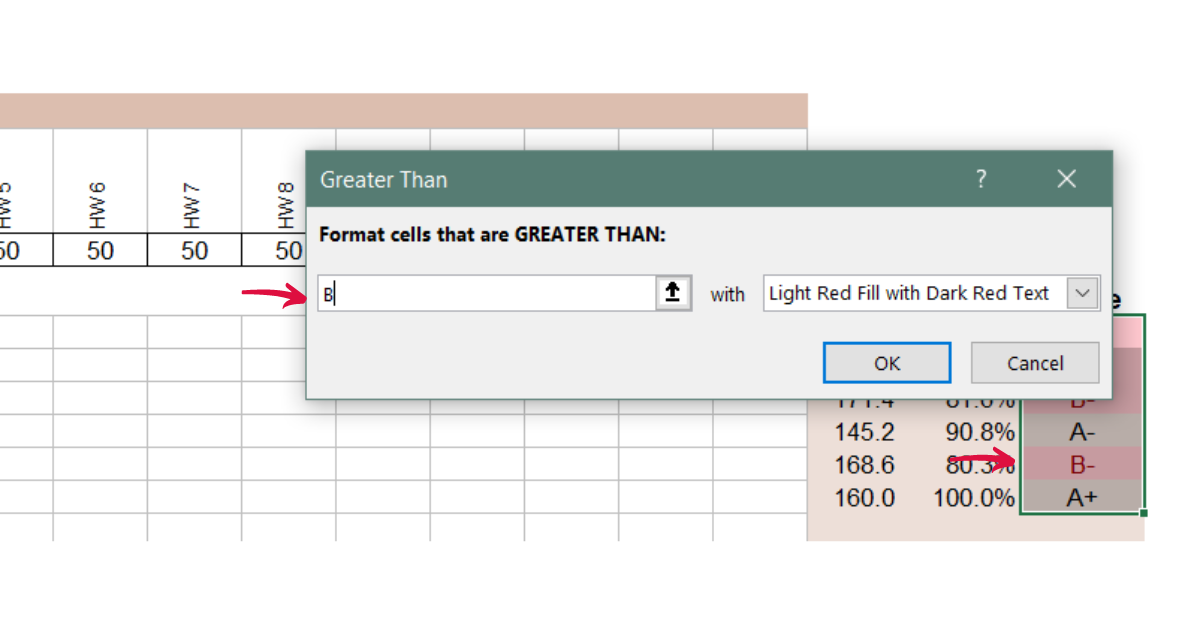
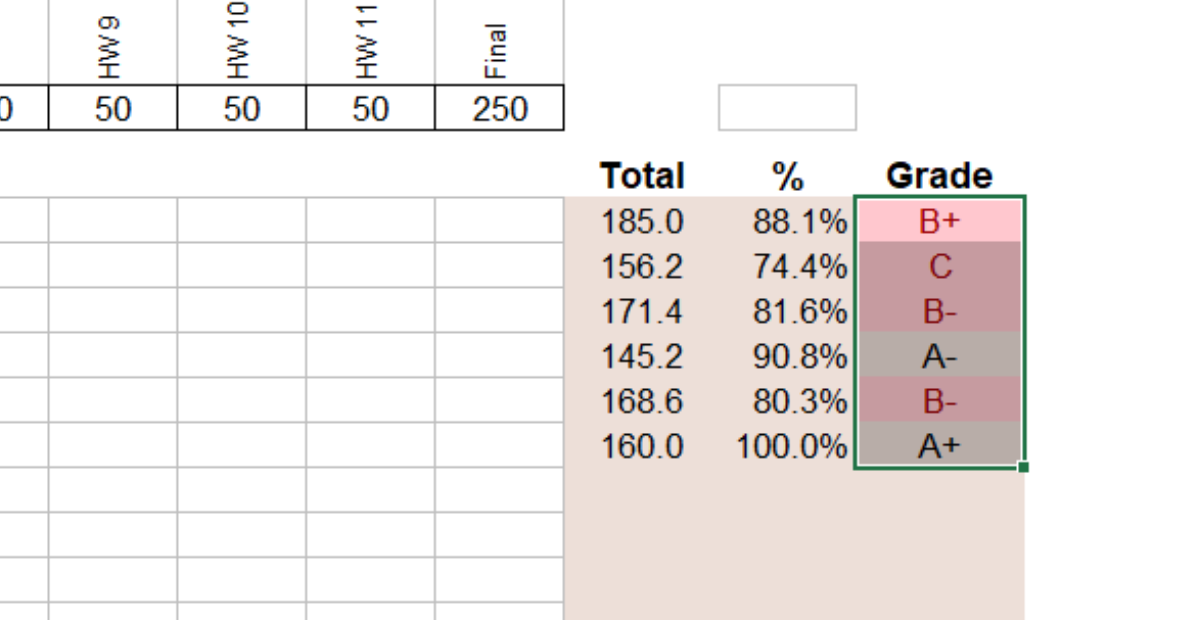
Step 4: Apply conditional formatting
This is an optional step. You can use conditional formatting to highlight scores above/below average.

Once you have double-checked your data, save your sheet locally and password-protect it before sharing it. This will ensure no one can change it.
Use case#3: Creating a lesson plan
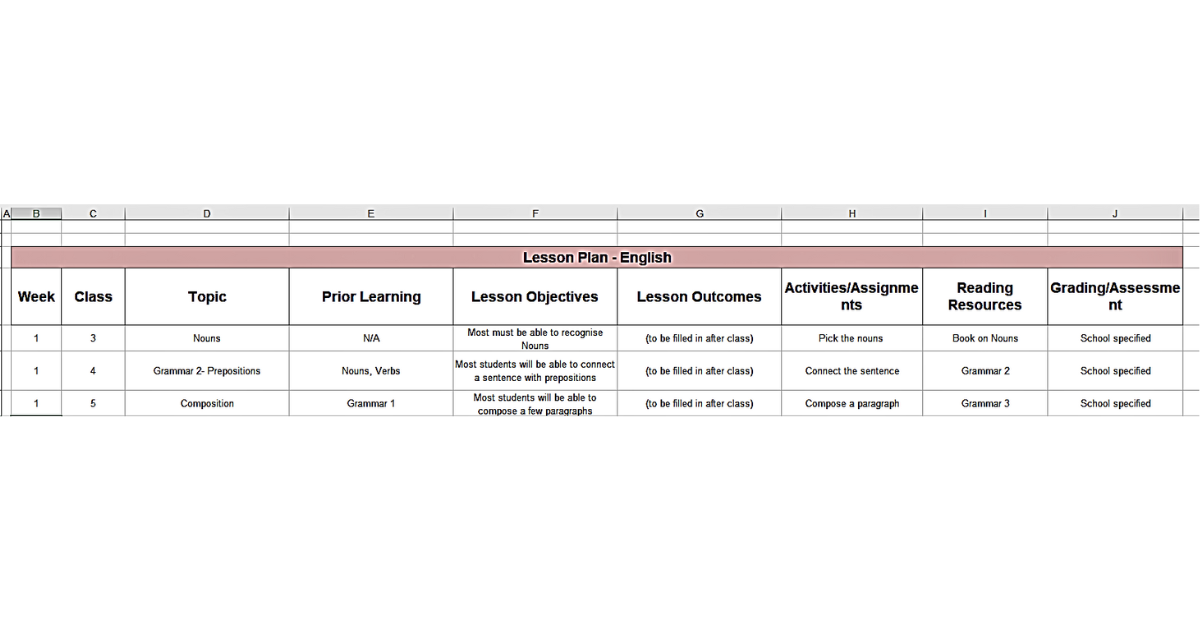
For a syllabus or lesson plan, open a fresh Workbook and create the following headers for the term lesson plan:
- Week/unit: This column will show the week number as the school prescribes. You can also create a separate week column that corresponds to the calendar.
- Class: The classes you teach.
- Topics: The lesson or syllabus topics you teach the various classes.
- Prior Learning: The learning that you intend to build upon.
- Learning objectives: The main objective your course is to achieve. You can have different objectives for different weeks.
- Lesson Outcomes: This column will help you keep track of your progress. Use it to mark the actual outcome of the activities and teaching.
- Readings/resources: Reading resources for the course work per week. You can also have one set of reading resources per term.
- Activities/Assignments: List weekly assignments and activities you prescribe for the subject.
- Assessment/Grading: The grading or assessment mechanism for the course. You can create a different mechanism for different course sections or add all the details in one merged column.
Step 1: Fill out the details
Once you have created your headers in the school management software in Excel, fill out the lesson plan details.
If you teach more than one subject, duplicate the sheet and create another plan for the next subject.
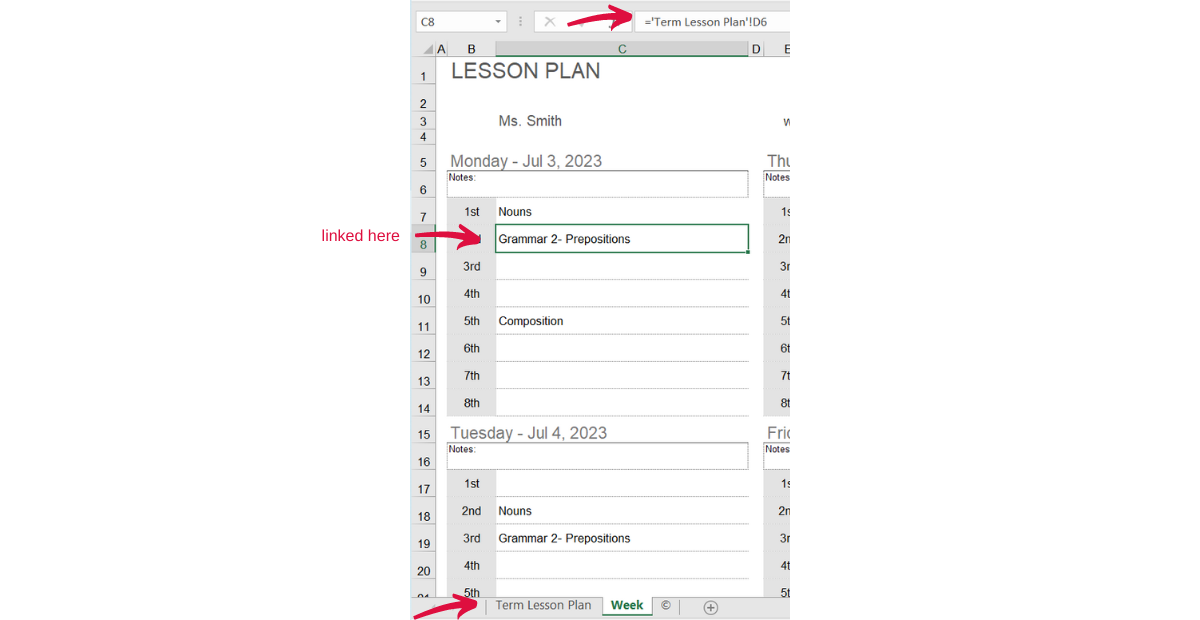
You can also create another variation with the same data fields. This one, however, makes use of cells instead of columns. You can view your entire day with the lesson plan on one page.

To use it with the term lesson plan, you can link the topics to the Week Lesson sheet.
Once you save your file, you can share it with anyone as a PDF.
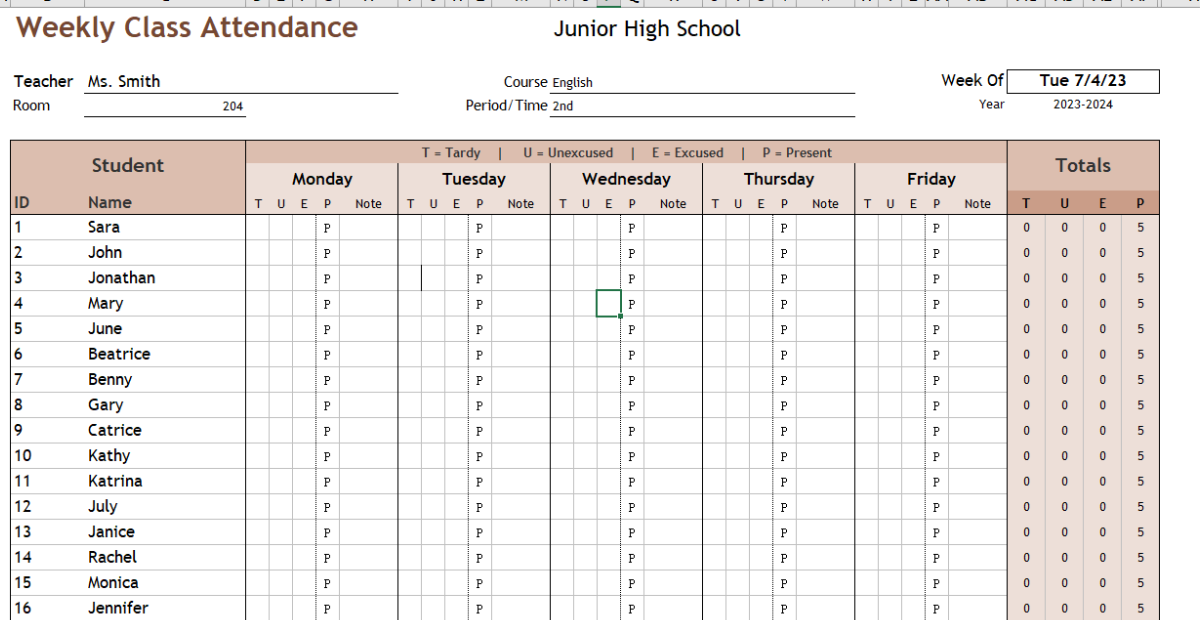
Use case#4: Creating an attendance record
Start with a new Workbook and create the following headers
- Student name: This column will list the names of all students in a class/course.
- Attendance status: You can split the attendance statuses into Tardy, Present, Unexcused and Excused. Conversely, you can keep one column for this and use formulas to calculate the total.
- Totals: This column calculates the total attendance for the week/month.
In our example, we use a template for Weekly attendance; you can replicate the “Attendance Status” columns to create the same sheet for a month.
Also, add cell values like “Teachers name”, “Course Name”, “Starting Date”, and “Year” to identify what the data is about.
Step 1: Fill out the sheet
Start filling the sheet by marking the attendance daily in your school management software in Excel.
Step 2: Calculating totals
The totals column will auto-populate. Use the COUNT formula to count all the attendance in the relevant columns.
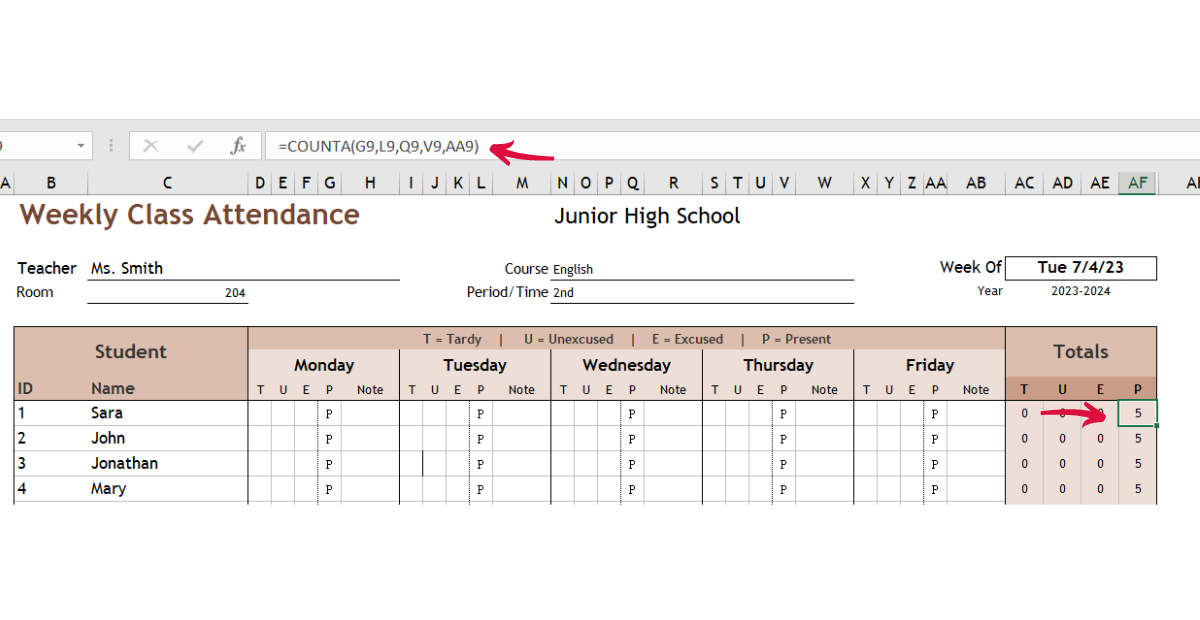
You can use any symbol to mark the attendance. The COUNT formula will consider all the cells that have been filled.
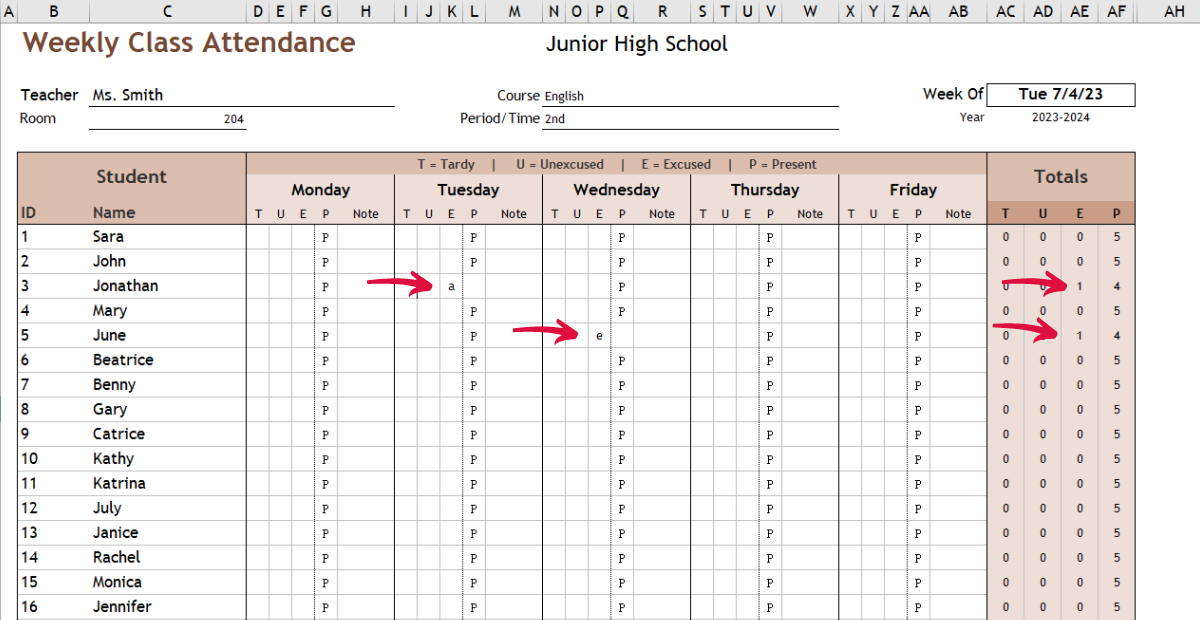
At the end of the sheet, calculate the total attendance of the class for the week/month. The total number of students should not be greater than the number of students in the class multiplied by the number of days the attendance sheet is marked for.
Automating the process
Excel has built-in features that allow you to automate your school management software in Excel. Consider using the following steps:
Step1: Use templates
Use a template from the numerous online templates that Excel offers. These templates have predefined column headers, formatting and formulas.
Use the sheet as a starting point and add/delete columns per your requirement. You can find the templates we used for this article here.
Copy, tweak, and use these SMS templates for your school.
Step 2: Add formulas
Use “SUM” to calculate the totals, “COUNT” to count the number of students or classes, and regular multiplication and division to process the data. Use “IF” to create constructs and “VLOOKUP” for analysis.
Step3: Import data
If you have data, you can export it to Excel using the import option. Your sheet will auto-populate with columns and headers. You cannot apply formulas and formatting to get insights from the data.
Step 4: Use data validation
The data validation tool helps you set a predefined list for any cell on your sheet. For example, your school can offer only a limited number of subjects to any student.
You can set them as a drop-down list when designing a class schedule. This will ensure you don’t accidentally enter classes students do not take.
Step 5: Add conditional formatting
As the name suggests, the tool formats data based on the conditions provided. You can use this tool when you want to see patterns.
For example, you can use this tool to see how many students had below-average attendance by changing the formatting of the cells.
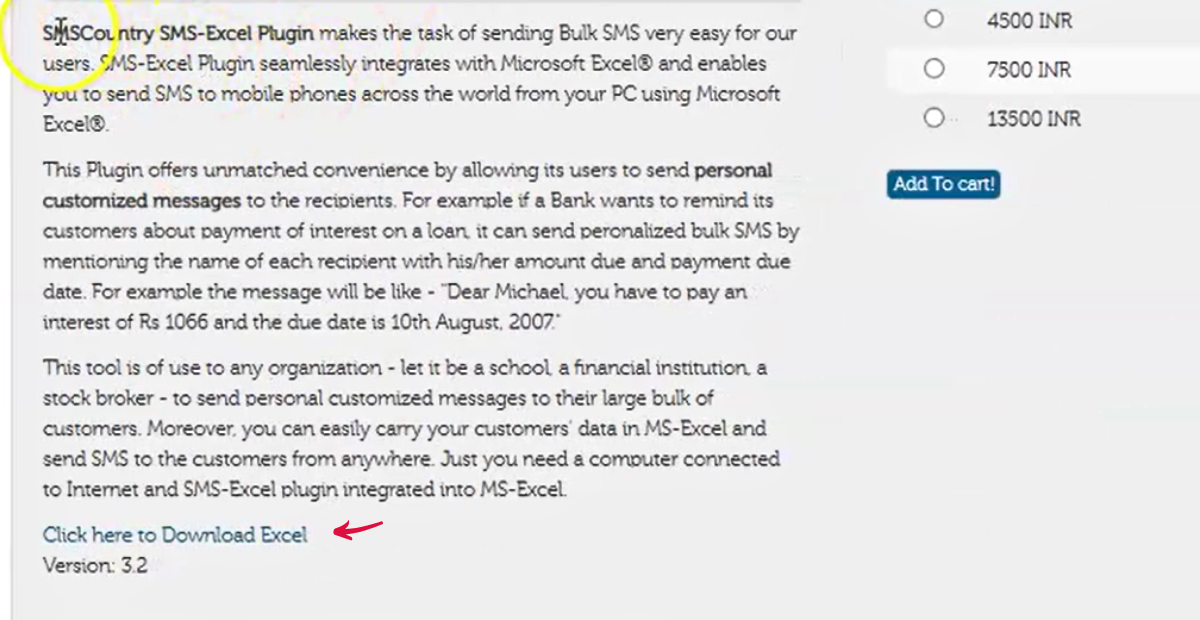
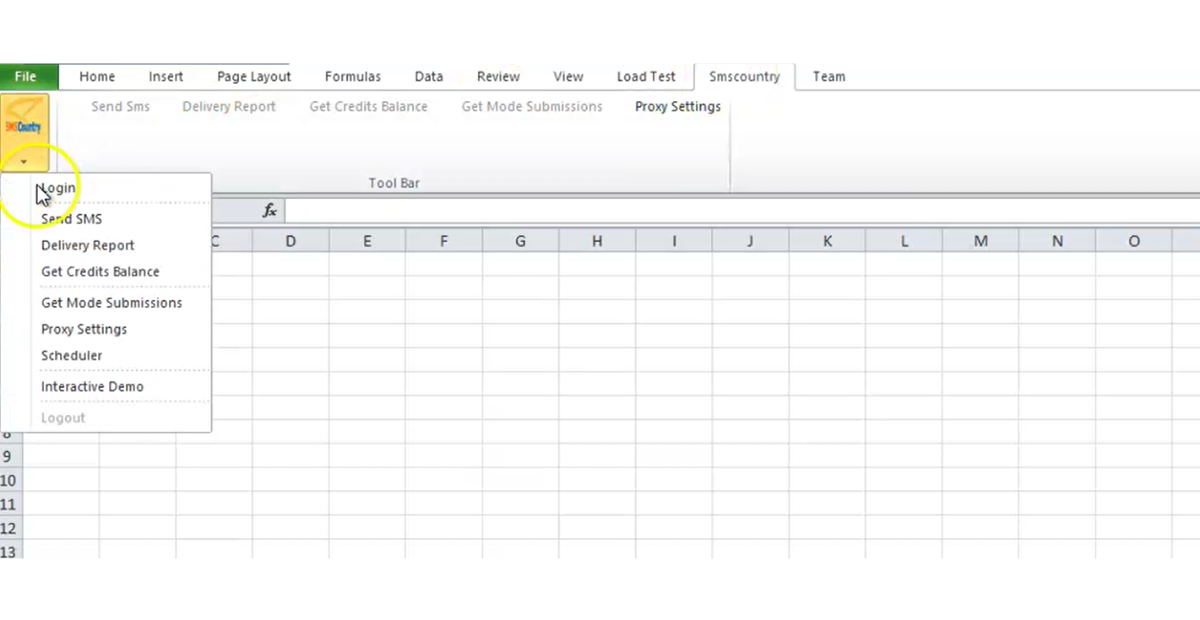
Step 6: Add SMS plugin
Lastly, you can add an SMS plugin to update teachers and parents via SMS. All you need to do is create an SMSCountry account download the plugin, and send SMSes from your workbook.
Speak with our team or schedule a demo to understand how this works.
You can find the SMSCountry plugin in the Features panel.
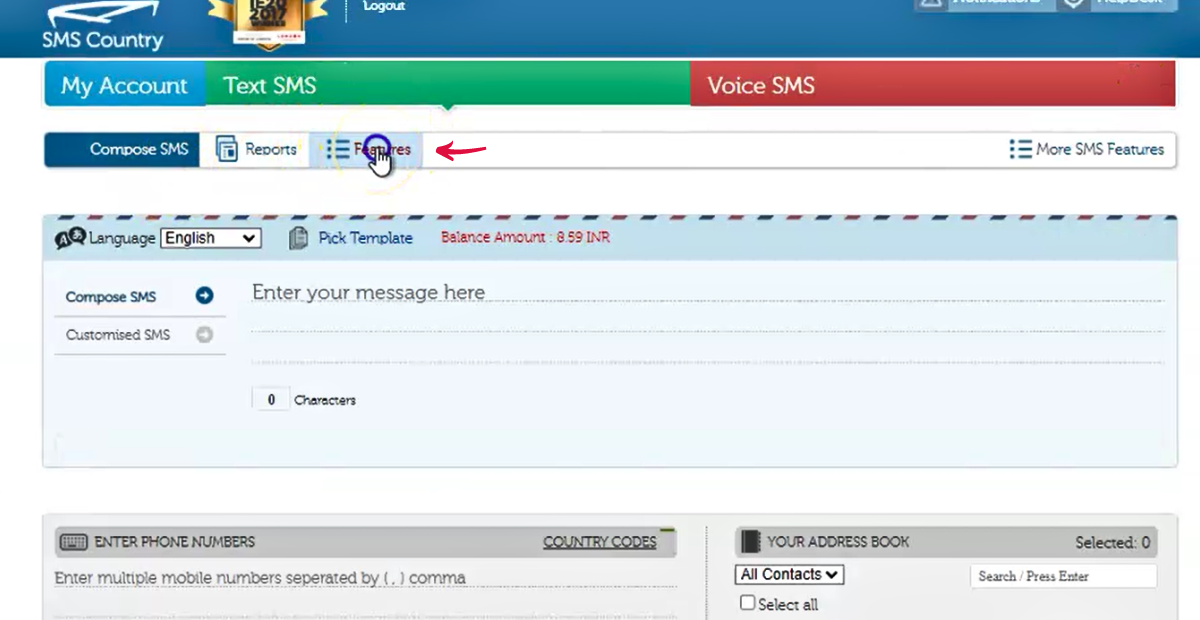
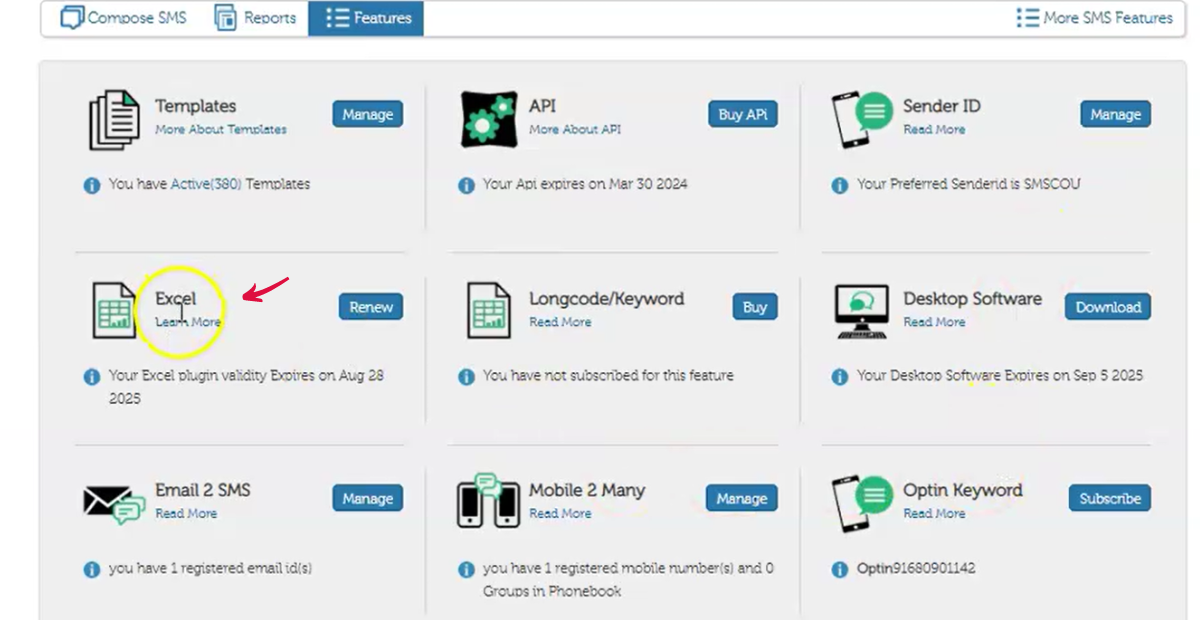
Once you install the plugin, you will see the SMSCountry tab in the Excel ribbon.
Contact our team if you encounter any challenges with this.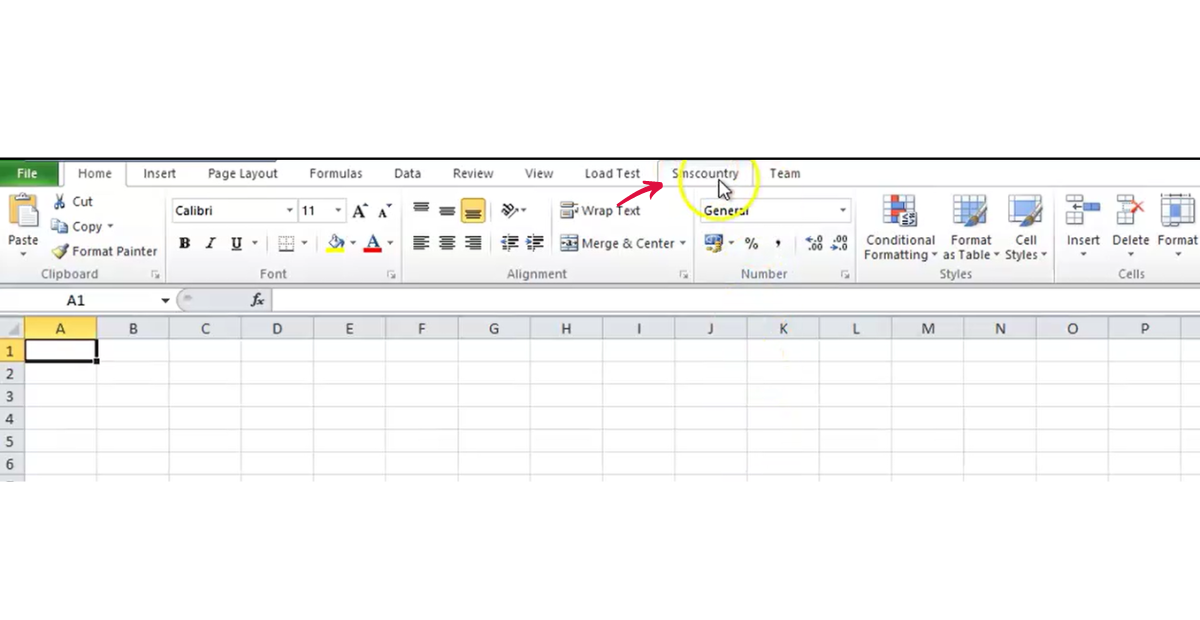
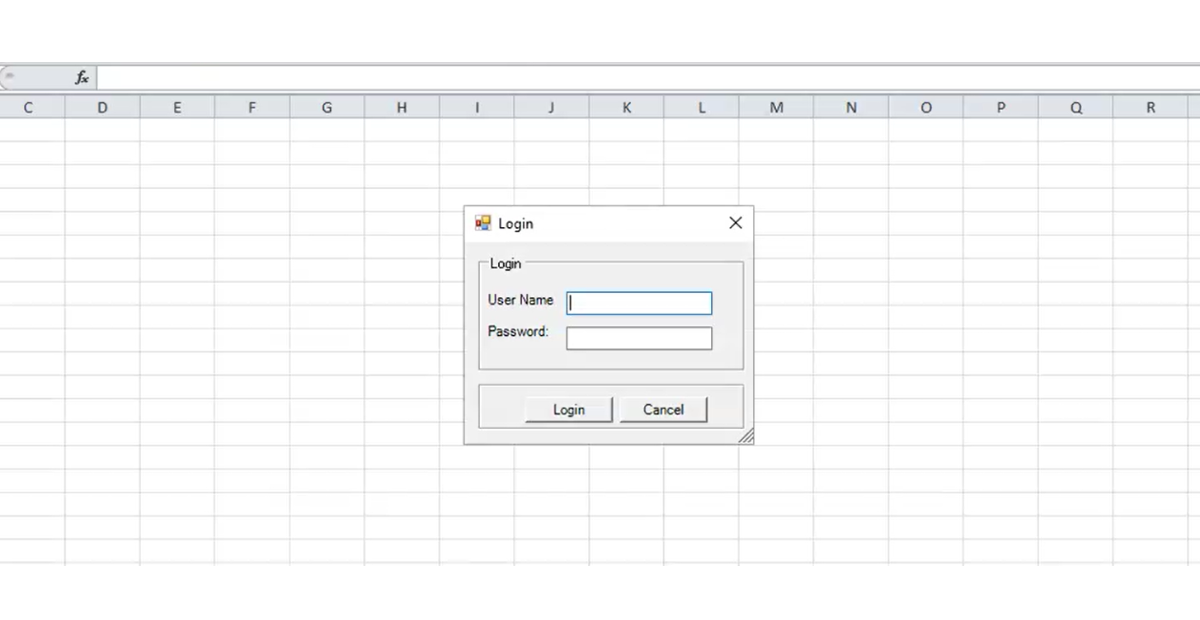
Simply log in with your username and password.
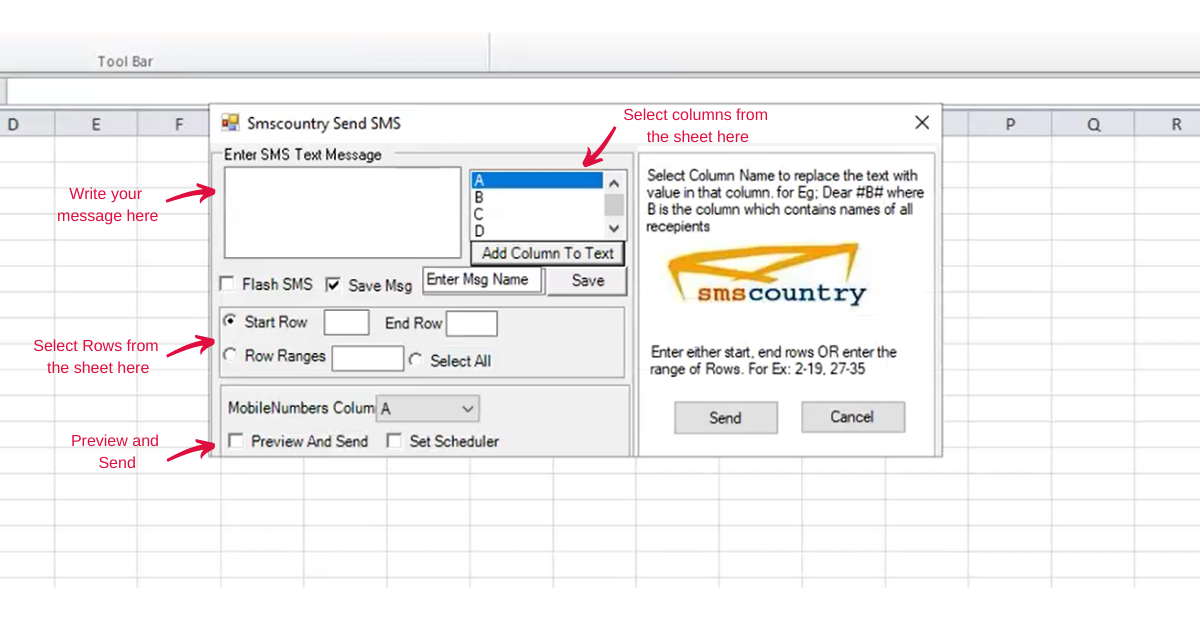
Now you can compose your SMS and send it to parents and students.
Generating reports
Step 1: Define your requirements
Identify which data points you want to include in your report.
For example, if you want to create a report showing cumulative student attendance, add average attendance totals, and the highest and lowest attendance per class. The names of the students may be insignificant in such a report.
Step 2: Create a Report sheet
Always create a separate sheet in your Excel workbook for your reports. You can merge different reports on the same sheet. But refrain from adding reports to your primary data sheets.
Step 3: Use formulas
Use formulas like “SUM”, “AVERAGE”, “COUNT”, “VLOOKUP”, and “LOOKUP to aggregate, summarise and display data based on specified criteria.
Step 4: Add charts and graphs
Visuals make things easier to understand. Add graphs from the “Charts” section on the “Insert” tab to create a view of your data.
Step 5: Format the report
Lastly, format the report for readability and presentation. Use font styles, colours and cell borders to highlight important information or visualise data trends.
Manage your school with SMSCountry
There you have it.
You can manage your class, take attendance and manage your lesson plan all from your school management system using Excel.
But that’s not all.
You can onboard new students and provide an excellent learning experience to students through personalised updates, notifications and messages via SMS.
SMSCountry offers a fast, reliable and powerful bulk SMS backed with all the customer support you need.
Schedule a demo and check out the Excel SMS plugin today!
